Recycle Bin has been around for as long as Windows, offering an easy way to separate files you don’t want to keep. While this is not universally acclaimed. It primarily means that you must effectively delete files twice before deleting them from your device. Many will appreciate the security mesh of this offer. But if you want to delete files instantly, here’s how it’s done. Skip the Recycle Bin when deleting.
How to Skip the Recycle Bin when deleting
You can bypass the Recycle Bin for a single occasion, or set it to delete items immediately. First, you can implement something whenever you want to delete something:
- Open File Explorer, either by searching or by clicking on the taskbar icon
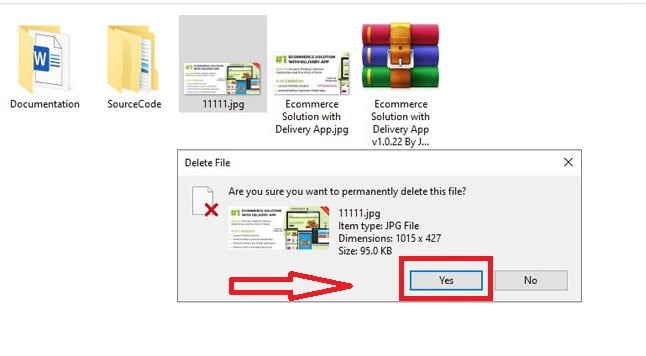
- Select the file you want to delete permanently and press Shift + Delete. Alternatively, right-click and hold Shift while clicking on the ‘Delete’ option
- You should then receive a message saying ‘Are you sure you want to delete this file permanently?’ Press Yes to confirm

If you don’t want to see yourself in a reusable bin for the future, there are more permanent changes:
- Right-click the Recycle Bin icon (on the desktop, taskbar or start menu) and select ‘Properties’
- Under ‘Settings for selected locations’, make sure you select the option that says’ Do not move files to recycle bin. Remove files as soon as deleted. ‘

- Press Apply to confirm the changes
- Now, when you delete any file as usual, it will give you the option to delete it permanently
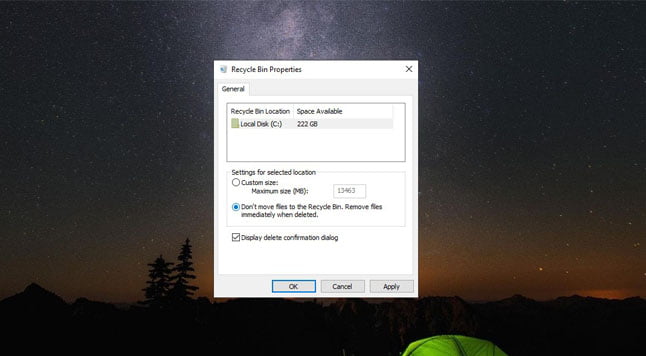
And By default, this will be set to C: drive, although you may have to repeat the process if the Recycle Bin saves files from other locations.
How to empty the recycle bin automatically
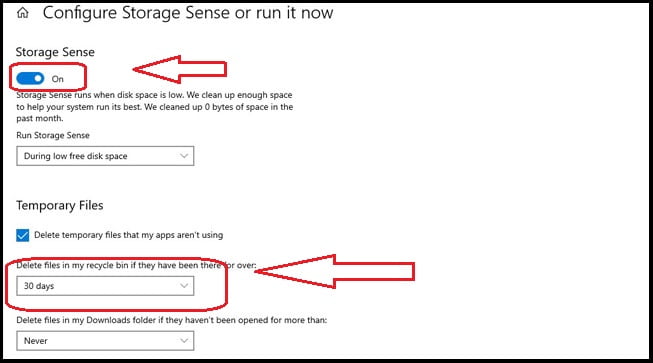
If removing that safety net is one step away, you can also set the Recycle Bin to empty automatically after a certain number of days.
It gives you some peace of mind if you accidentally delete something important, while at the same time making sure your PC is not stuck with the files you need. The set to empty after 60 days, but it can be easily customized via the Storage Sense menu:
- Go to Settings> System> Storage
- Turning off the ‘Storage Sense’ toggle will stop emptying it completely, so it is probably worth clicking on the ‘Configure Storage Sense or Run Now’ option
- Under ‘Temporary Files’, delete files in My Downloads folder if they are for ‘Over’, then click the drop-down and make your choice.

While you are here, see more about: How to Shutdown Windows with Voice Using Cortana